


This feature provides a tool to GSAK users to create logs and publish them to geocaching.com. Users can use this feature to create and publish logs one at a time (as at the geocaching website) or as a collection to be published in batches or all at once, allowing users to create the logs off-line and publish when convenient.
During the editing process users can add images, coordinates, favorite points,...(all the elements of any log). While editing a log for a particular geocache, users see all the information that is in the GSAK database on that geocache. A powerful "template" feature is also implemented to help users create large numbers of similar logs as during cache runs and to apply such templates at the start of the editing process or while editing each log Before publishing, users can sort the list into the order in which the logs should be published.
The publishing process requires an internet connection to access the geocaching.com API. After publishing each log, GSAK also inserts a copy into the currently selected database and adjust the found status in the database.
Internally GSAK maintains a table (called PublishLogs) for logs that are being developed in preparation for publishing. The "Publish Logs" dialog displays this table. Getting log entries into this table is accomplished with one of the following: (1) in the main GSAK display grid, right-click on any geocache and select "Add to publish logs", (2) with a GPSr attached to the computer as a USB drive, in the Publish Logs tool, select Fetch, from GPSr (it will populate the table with information from the Fieldnotes file in the GPSr), (3) from Fieldnotes file stored elsewhere (Fetch, from file), or (4) initiate a log for the cache that is currently selected in the display grid.
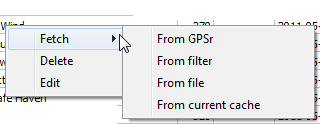
From Gpsr - Select this option if you have "Geocaching friendly" GPSr connected (For example, Colorado, Oregon, Dakota, eXplorist GC) that has a standard format Geocache_Visits.txt file. Note: Garmin doesn't provide any means to delete a found entry, so, if you log a cache by mistake (which is easily done), you have to add the 'Unattempted' log afterward to cancel it. When fetching logs, if you entered a found log then a later unattended, the found log will be removed.
From Filter - The grid will be populated with caches from your current filter of caches.
From File - Select this option to populate the grid from a standard format Geocache_Visits.txt file. Unlike the "From GPSr" option, you do not have to have a GPSr connected. As long as you can specify the location of the file and the format is valid, then you can load it.
From current cache - use this option to add just the currently selected cache to the grid.
Once a list of potential logs has been fetched, it is presented in the form of a grid where each row represents an individual log and the columns include the code and name of the geocache, in addition to the following columns:
Sequence number - an integer generated (in steps of 10) by GSAK exclusively to provide a powerful method for sorting the logs to allow the user to control the order in which they are published. This integer can be edited when editing the log, to change the sort order of the grid. This is particularly useful if extensive sort order changes are needed when logging power trails; also buttons are provide for moving one or two items. After editing a sequence number click the Seq header twice to show the new sort order in the grid.
Log type - the log type as at geocaching.com
Date and time - the time-stamp that will be given to the log when it is published at geocaching.com
Published - status of the log: this changes to Yes after the log has been published.
Note that sorting the grid can be accomplished by clicking on a column header. However it should be noted that sorting by any column other than the sequence number disables some of the buttons that act on the grid. To enable the buttons again, click on the Sequence number column heading.
The dialog and possible actions are as follows:
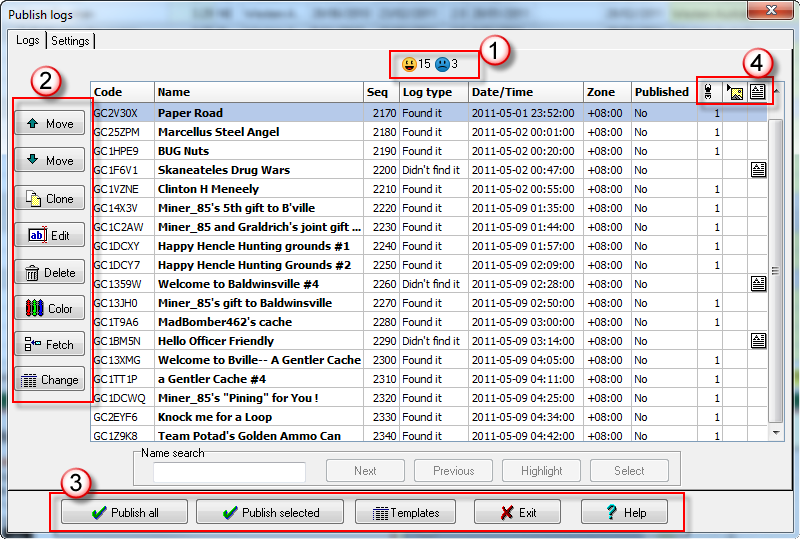
Move - Use the move buttons to change the order (sequence number) in the grid. When you publish logs they are published in the order as shown in the grid by sequence number.
Clone - Use to make a copy or clone of the selected log.
Edit - Edit the selected log
Delete - delete all selected logs. Any log that has been "selected" will be deleted. The grid supports the standard methods of record selection. You can select using the mouse - Drag the mouse over rows to select a contiguous block. To select non contiguous rows, hold down the Ctrl key on the keyboard, and then click your mouse on the required rows. From the keyboard, Ctrl-A to select *all* entries, Hold down the shift key and use the cursor keys to select contiguous rows. As a side note, you can also use Ctrl-C to copy the selected rows to the clipboard. The format copied to the clipboard is compatible with Microsoft Excel, so you can just paste the data into a spread sheet if you wish.
Color - You can color any log or group of logs (by selecting them) as a visual reminder for some later action or just to make them stand out. This action doesn't affect the data - it is visual only.
Fetch - see here
Change - Use this button to make bulk changes to the log type or date/time. Select the logs you want to change and then click on this button. You will then see this dialog
Note: The Seq number column is used internally by GSAK for the publish order of your logs. You can change it via "Edit" and it will automatically be updated when you use the "Move" buttons. This number can not be reset (GSAK keeps a history of your published logs) and is and integral part of the publish logs dialog.
Publish all - This option will publish all the logs in your grid
Publish selected - Only the selected logs will be published. See the Delete notes above on how to select entries in the grid
Templates - This allows you to directly edit templates from here rather than having to go through the edit dialog.
Exit - Exit this dialog
Help - Bring up the help for this dialog.
Note - Any cache name that shows in bold means that there are field notes attached. It is not possible to have field notes attached when fetching from a filter, so in that case none of the names will be in bold.
-----------------------------------------------------------------------------------------------------------------------------------------------------------------------------
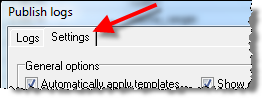
Now click on the Setting tab to see the available settings
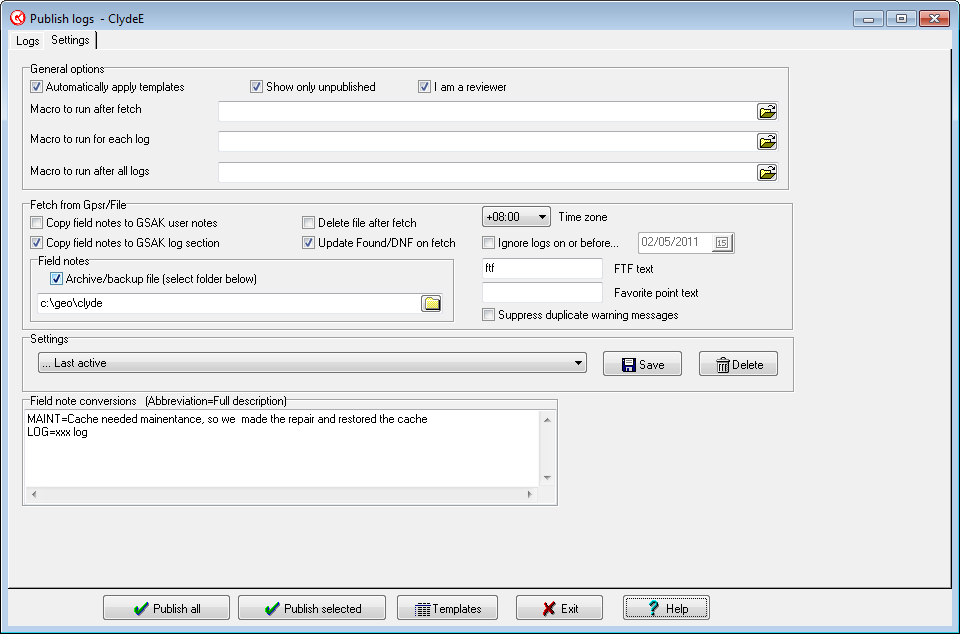
Automatically apply templates - Select this option to have GSAK automatically apply your templates when you do a log fetch. This option is the default and recommended. It is particularly handy when logging power trails. If you don't select this option then each time you want to use a template it will need to be inserted manually. Note: if you find yourself in a situation where you need to changed your templates after you have done the fetch and then want the changed templates applied, then right mouse click in the grid and select the option "Reapply templates". This option only runs on selected records in the grid (see notes on Delete for selecting entries in the grid)
Show only unpublished - Normally you would only want to work with unpublished logs (the default). However, GSAK saves all your logging history so you can review old published log entries by unchecking this option.
I am a reviewer - Check this box if you are a Groundspeak reviewer. This will enable "reviewer only" log types for all logs.
Macro to run after fetch - This option allows you to run a macro after doing any type of fetch. For more information see this link
Macro to run for each log - This feature has been added to cater for some of the more personal or esoteric requests and prevent clutter of the GUI from feature creep. Basically, after each log is published the corresponding macro will be run. In addition there are 3 system variables that are specific to this macro:
$_PublishId1 - The RowId of the corresponding entry in the PublishLogs table. You can view the contents of this table in SqliteSpy or the GSAK sqlite manager. This table is in the database gsak.db3 located in your [application data] folder
$_PublishId2 - The RowId of the corresponding log entry in the logs table (as downloaded from Geocaching.com)
$_PublishCode - The GCXXXX code of the log
In addition there is a special function which is also only applicable to this macro:
PublishTags(sTagString) : string
This function will resolve any of the %tags you can use in templates. Note that the sTagString is not restricted to just a single tag. It will render all tags that you throw at it. Think of it as being similar to the preview panel in the publish logs edit dialog. That is, you can place any text you like in the this string. The return result will be that same text but with any recognized template tags converted to the corresponding values.
You don't have to update the Caches table with this macro, but if you do then you should always do a seek() using $_PublishCode. GSAK does not demand that published caches exist in the database. By doing the seek() you not only confirm existence of the cache in the database but you also position the internal cache record pointer so that all the $d_ variables are populated correctly.
Example 1 - update the GSAK user notes with the log text (that you just published) from Geocaching.com.
If seek($_PublishCode) $result = sqlite("sql","select lText from logsall where rowid = $_PublishId2","SqlGet=Yes") $d_UserNote = sqlGet("lText") SqlGetClose Endif |
Example 2 - update user data with the date/time from the PublishLogs table
If seek($_PublishCode) $result = sqlite("open","$_AppData\gsak.db3") $result = sqlite("sql","select pDate from PublishLogs where rowid = $_PublishId1","SqlGet=Yes") $d_UserData = sqlGet("pDate") SqlGetClose Endif |
Note: You are not restricted to updating only one field. For example, to combine examples 1 and 2 in the same macro the code would be:
If seek($_PublishCode) $result = sqlite("sql","select lText from logsall where rowid = $_PublishId2","SqlGet=Yes") $d_UserNote = sqlGet("lText") SqlGetClose $result = sqlite("open","$_AppData\gsak.db3") $result = sqlite("sql","select pDate from PublishLogs where rowid = $_PublishId1","SqlGet=Yes") $d_UserData = sqlGet("pDate") SqlGetClose |
Endif
For trackables, GSAK also creates a table named PubishTrackablesMacro. For more information see this link
Macro to run after all logs - Use to run a macro after all logs have been published. If you would prefer this macro run without intervention (that is, not having to click on OK to the log summary before the macro is run) then add "?StopSummary" (without the quotes) to the called macro - from more information see this post. This macro can perform many actions but the most common would be to add caches to your current database where you have entered logs but the corresponding caches don't already exist in this database. If you want the macro to do this then simply make sure the following line of code is in this macro:
GcGetCaches Settings=GSAK_PublishLogs GcCodes=PublishLogs |
Time zone - This is the default time zone that will be used to display the date and time of your logs. This value is "sticky", but if it is different to the time zone fetched from your computer date/time settings you will get a popup asking if you want to revert to your computer setting.

Copy field notes to GSAK user notes - Select this option to have any field notes automatically update the GSAK user notes section. See Waypoint=>Add/change/delete notes.
Copy field notes to GSAK log section - Select this option to have any field notes automatically update the GSAK log section. See Waypoint=>Add/change/delete notes.
Update Found/DNF on fetch - Select this option to update the found/dnf status of caches in the current database at the time of fetching the logs.
Delete file after fetch - This option is would normally be used when you fetch from GPSr. Check this option to have the field notes file removed after the fetch has been done. This is usually to prevent you from logging duplicates (otherwise the old logs will be fetched when you do the next run)
Archive/backup file - Use of this option would normally be in conjunction with the previous option. GSAK will take a backup of this file and place it in your [application data] folder (you can find this folder using "File=>Folder finder" ). The backup file is named YYYYMMDDHHMMSS_FileName where YYYY = Year, MM=Month, DD = day, HH = Hour, MM = Minute, SS=Seconds, and FileName is the original file name.
Ignore logs before - If you opt to keep your file after a fetch then you may want to use this option to ignore older logs in this file so they don't get loaded again.
Field notes - When you fetch your field notes from your GPSr you can elect to have GSAK take a backup copy of these notes. GSAK creates a file name the same as your field notes file but with the appended current date and time. These files are located in the folder you specify here.
FTF text - If you enter text here GSAK will search for this exact text in the field notes and set the FTF flag on the edit dialog if this text is found. This saves you having to set the box manually each time, but it does mean you should use a unique phrase for this feature to work as expected.
Favorite point text - If you enter text here GSAK will search for this exact text in the field notes and set the "Add favorite point" check box the edit dialog if this text is found. This saves you having to set the box manually each time, but it does mean you should use a unique phrase for this feature to work as expected.
Suppress duplicate warning message - When fetching caches to publish, GSAK checks for duplicates (same log type for this cache) and issues a warning message for duplicate log entries found. If you find this message annoying, you can stop it from showing by checking this box.
Settings - Like many GSAK dialogs you can save and restore settings. This enables you to save settings for different cache runs and restore them as required. Templates are also saved and restored as part of settings so you can set up different groups of templates using this feature.
Field note conversions - Writing field notes on a GPSr can be challenging to say the least. To help you keep the number of characters to a minimum, GSAK supports abbreviations that will be expanded to the full version in your field notes. The format is Abbreviation=Full text. You can include a line feed in your converted text by using the reserved string "$_CrLf" (without the quotes)